English
 Español
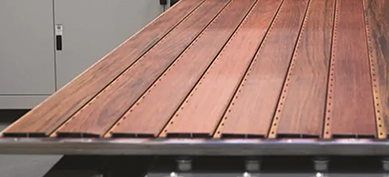
PS Wall Panel Installation Pitfall Guide: 10 Most Common Mistakes to Avoid When Installing Yourself
The biggest advantage of PS wall panels is that you can install them yourself and save hundreds on labor costs. But over the years at our factory, I've seen too many DIY regrets: panels popping off, gaps as wide as the Grand Canyon, glue squeezing out from seams and turning yellow…
Actually, these problems are completely avoidable. Here are 10 mistakes that 90% of DIY beginners make. Read this before you start, and save yourself the hassle of redoing the work.
Mistake 1: Skipping wall preparation
Consequence: Panels fall off after just a few days.
Correct way: The wall must be smooth, dry, dust-free, and grease-free. Remove old wallpaper and loose paint. Clear away nails and tape residue. Fill any holes with patching compound. Wipe the wall with a damp cloth and let it dry completely before installing.
Mistake 2: Using acidic or alkaline silicone adhesive
Consequence: The coating on the back of the panel corrodes, leading to poor adhesion; or the panel becomes brittle and cracks after a few months.
Correct way: Always use neutral silicone adhesive. Look for the word "neutral" on the tube. Acidic glue smells like vinegar, alkaline glue smells like ammonia – both will damage PS material.
Mistake 3: Applying too little or too much adhesive
Consequence: Too little adhesive – panels won't stick firmly and will feel hollow. Too much adhesive – glue squeezes out from the gaps, dries yellow, and looks like ugly dried mucus.
Correct way: Apply adhesive in dots or an S-shape, with dots spaced 20–30 cm apart. Leave a 2–3 cm margin around the edges of each panel to prevent squeeze-out. Less is often better – after pressing the panel, you should feel even adhesive distribution.
Mistake 4: Not leveling immediately after installation
Consequence: Panels go on crooked, gaps become uneven – the whole wall looks drunk.
Correct way: After pressing the panel onto the wall, use a spirit level (or a level app on your phone) to adjust its position within 20 minutes. After that, the adhesive starts curing, and moving it becomes very difficult.
Mistake 5: Butt-joining panels with no gap
Consequence: Thermal expansion causes panels to push against each other, leading to lifted edges or bulging surfaces.
Correct way: Leave a 1–2 mm natural gap between panels. You can use a bank card or business card as a temporary spacer – remove it after mounting. Gaps also hide slightly uneven cuts.
Mistake 6: No temporary fixing after mounting
Consequence: While the adhesive is wet, gravity can make panels slide down or tilt outward, causing misalignment or enlarged gaps.
Correct way: After leveling, use painter's tape (masking tape) around the edges of the panel to hold it firmly against the wall or adjacent panels. Leave the tape on for at least 24 hours until the adhesive fully cures.
Mistake 7: Snapping panels without scoring first – chipped edges
Consequence: Edges look chewed up, gaps become wide and uneven.
Correct way: Score the back of the panel along the cut line with a utility knife several times, until the cut depth is more than half the panel thickness. Then snap it by hand. For clean cuts, avoid scissors or saws unless you have a power saw. Lightly sand the edge after cutting
Mistake 8: Not cutting holes for outlets and switches in advance
Consequence: You reach an outlet and realize the panel doesn't have a hole – forcing you to cut a messy hole on the spot.
Correct way: Before mounting, measure the exact positions of outlets and switches. Mark the cutout on the panel and cut it with a utility knife or hole saw. Then mount the panel. If you forget, you can cut from the front with a drill and hole saw, but it risks chipping the edge.
Mistake 9: Poor corner treatment – cutting flush at inside/outside corners
Consequence: Raw panel edges are exposed at corners – ugly and vulnerable to dust and moisture.
Correct way:
- Outside corners (convex):Use corner trims (L-shape or U-shape) to cover the edges, or miter-cut two panels at 45° and join them.
- Inside corners (concave):Butt one panel into the corner and overlay the other panel on top, then seal the seam with adhesive.
Outside corner trims are cheap (a few dollars per meter) and work great.
Mistake 10: Scrubbing the panels with a wet mop just because they're "waterproof"
Consequence: The wear layer becomes scratched, the surface turns matte, and eventually the print layer wears off.
Correct way: Use a feather duster or soft cloth for daily dusting. For stains, wipe gently with a slightly damp soft cloth and mild dish soap. Never scrub with a wet mop, steel wool, or strong solvents like alcohol or acetone.
Frequently Asked Questions (FAQ)
Q1: Where is your factory located?
A: No. 10-1 Lianhong Road, Yuanhua Town, Haining City, Zhejiang Province, China.
Q2: If I've already mounted a panel crooked, can I remove it and redo it?
A: Within 24 hours while the adhesive is still curing, you can carefully peel it off, clean off the old adhesive, and reapply. After 48 hours, it's very difficult to remove without breaking the panel. That's why it's best to level within the first 20 minutes.
Q3: What's the easiest way to cut panels at home?
A: For DIY, the best method is utility knife + straight edge. Score the line 3–5 times with the knife along a ruler, then place the panel back-side up along the edge of a table. Press down on the part overhanging the table, and it will snap cleanly. No sawdust, no mess.
Q4: How long after installation can I wash the panels or hang pictures on them?
A: Adhesive takes 24–48 hours to fully cure. During this time, don't touch the panels, wash them, or drill holes. After 48 hours, they are ready for normal use.
Q5: Can I install PS panels directly over ceramic tiles?
A: Yes, if the tiles are clean, grease-free, and wax-free. Lightly sand the glossy surface with sandpaper to improve adhesion, then use neutral silicone. Do not install over loose or hollow tiles.
Q6: Are there any places where PS panels should never be installed?
A: ① Outdoors (sun and rain cause fading and aging); ② Inside the shower area (direct water spray and prolonged moisture); ③ Directly behind a cooktop or open flame (even flame-retardant panels have limits); ④ Over uneven old walls that haven't been prepared (they will lift).