English
 Español
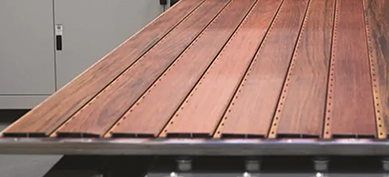
Architectural WPC wall panels have become an increasingly popular choice for interior wall finishes due to their combination of aesthetic versatility, durability, and low maintenance requirements. These panels, composed of wood-plastic composites, provide a sustainable alternative to traditional wood and synthetic materials, offering resistance to moisture, insects, and warping.
Introduction to architectural WPC wall panels
Architectural WPC wall panels are designed to simulate the appearance and texture of natural wood while leveraging the benefits of polymer composites. The core composition typically consists of wood fibers, PVC, or other thermoplastic materials, which are fused to form panels of varying thickness, width, and length. These panels are widely used in residential, commercial, and institutional interiors, including living rooms, offices, hotels, and healthcare facilities.
The advantages of architectural WPC wall panels include:
- Moisture resistance, making them suitable for high-humidity areas such as bathrooms and kitchens.
- Durability and resistance to impacts, scratches, and pests.
- Low maintenance, requiring only periodic cleaning with mild detergents.
- Aesthetic flexibility, with options in color, grain, and surface finish to match interior designs.
- Sustainability, as many WPC materials incorporate recycled plastics and reclaimed wood fibers.
By understanding these properties, installers can maximize the performance and longevity of the panels.
Preparation for installation
Proper preparation is essential before installing architectural WPC wall panels. This stage ensures that the panels adhere securely and perform as intended over time.
Assessing the wall surface
The wall surface must be structurally sound, clean, and dry. Uneven surfaces can result in gaps or misalignment of the panels. Common wall materials suitable for WPC installation include concrete, brick, gypsum board, and plywood.
Table 1: Recommended wall surface conditions for WPC panel installation
| Wall Material | Surface Requirements | Notes |
|---|---|---|
| Concrete or masonry | Smooth, clean, dry, free of dust | Use leveling compound if uneven |
| Gypsum board | Even, dry, free of cracks | Ensure wall studs are properly aligned |
| Plywood or wooden wall | Smooth, dry, securely fastened | Check for rot or warping |
Tools and materials
To ensure a professional installation, the following tools and materials are generally required:
- Measuring tape and spirit level for accurate alignment.
- Chalk line to mark panel positions.
- Power drill and screws for secure fastening.
- Construction adhesive for additional bonding.
- Panel spacers to maintain consistent gaps between panels.
- Saw or cutting tool for trimming panels to fit corners and edges.
Selecting high-quality materials and tools ensures the panels remain securely attached and aligned over time.
Acclimation of panels
Architectural WPC wall panels should be acclimated to the room environment before installation. This involves storing the panels in the installation area for at least 48 hours to allow them to adjust to temperature and humidity levels. Proper acclimation prevents warping, expansion, or contraction after installation.
Installation methods
There are multiple methods for installing architectural WPC wall panels, each suited to different wall types and design requirements. The two primary approaches are mechanical fastening and adhesive installation.
Mechanical fastening
Mechanical fastening involves attaching panels directly to wall studs or battens using screws, nails, or clips. This method is often preferred for heavy panels or walls with irregular surfaces.
Steps for mechanical installation:
- Mark reference lines: Use a chalk line and level to draw horizontal or vertical reference lines on the wall. These lines guide panel placement.
- Install battens or furring strips: For uneven walls, battens are fixed vertically or horizontally to provide a level surface for panel attachment.
- Position panels: Place the first panel along the reference line. Ensure that the panel is plumb and aligned.
- Fasten panels: Secure the panel with screws, nails, or clips through pre-drilled holes or designated mounting points. Avoid over-tightening, which can deform the panel.
- Continue installation: Sequentially add panels, using spacers if necessary, to maintain uniform gaps.
- Trim edges: Cut panels to fit corners, openings, or wall ends using a fine-toothed saw or panel cutter.
Adhesive installation
Adhesive installation is suitable for lightweight panels or when mechanical fastening is impractical. This method uses high-quality construction adhesive to bond the panels directly to the wall.
Steps for adhesive installation:
- Prepare the adhesive: Select a polymer-based adhesive compatible with WPC materials.
- Apply adhesive: Spread a uniform layer on the back of the panel using a notched trowel.
- Position panel: Press the panel firmly against the wall, ensuring it aligns with reference lines.
- Secure with temporary supports: Use panel clamps or spacers to hold the panel in place until the adhesive cures.
- Continue installation: Repeat for subsequent panels, maintaining consistent spacing.
- Allow curing time: Follow the adhesive manufacturer’s recommendations for drying and curing before removing temporary supports or applying load.
Design considerations during installation
While installing architectural WPC wall panels, attention to design details ensures the final appearance aligns with the intended aesthetic.
Panel orientation
Panels can be installed vertically, horizontally, or diagonally, depending on the desired visual effect. Vertical panels can create a sense of height, while horizontal installation emphasizes width. Diagonal installation offers a unique design feature, but requires precise measurement and cutting.
Joint alignment
Maintaining consistent panel joints is crucial for a professional finish. Tongue-and-groove designs are common, allowing panels to interlock securely. Small gaps may be left for thermal expansion and contraction.
Finishing edges
Corners, trim, and molding should complement the panels. Edge profiles or corner trims help cover gaps, protect edges, and provide a polished look. Using trims that match the panel color or finish enhances continuity.
Safety precautions
Safety is critical during the installation of architectural WPC wall panels:
- Wear protective gloves and eyewear to prevent injury from sharp edges or cutting tools.
- Ensure the work area is well-ventilated when using adhesives.
- Follow proper lifting techniques when handling large panels to avoid strain.
- Check that electrical outlets, switches, and other wall fixtures are accessible before fixing panels.
Maintenance after installation
Proper maintenance preserves the appearance and functionality of architectural WPC wall panels:
- Clean regularly with a soft cloth or sponge using mild detergent and water.
- Avoid abrasive cleaning materials that may scratch the panel surface.
- Inspect for gaps, loose panels, or water infiltration periodically.
- For scratches or minor surface damage, use touch-up kits or sanding as recommended by the material manufacturer.
Table 2: Recommended maintenance practices for WPC wall panels
| Maintenance Task | Frequency | Method |
|---|---|---|
| Surface cleaning | Weekly | Soft cloth with mild detergent |
| Inspection for loose panels | Quarterly | Visual check and re-tighten fasteners if necessary |
| Moisture assessment | Quarterly | Check for signs of water seepage or mold |
| Minor repairs | As needed | Sanding, adhesive touch-up, or panel replacement |
Conclusion
The installation of architectural WPC wall panels on interior walls requires careful planning, precise execution, and adherence to safety and design standards. By assessing the wall surface, selecting appropriate installation methods, and maintaining the panels properly, designers and installers can achieve a durable, aesthetically appealing finish. Whether using mechanical fastening or adhesive techniques, understanding the properties and limitations of architectural WPC wall panels ensures optimal performance and longevity.
FAQ
Q1: Can architectural WPC wall panels be installed in bathrooms?
Yes, they are suitable for high-humidity areas due to their moisture resistance.
Q2: Do I need professional installation for architectural WPC wall panels?
While DIY installation is possible, professional installation ensures precise alignment and long-term durability.
Q3: How long does adhesive curing take for WPC panels?
Curing time varies by adhesive type but generally ranges from 24 to 48 hours.
Q4: Can WPC panels be painted after installation?
Yes, most panels can be painted using compatible wood or polymer paints.
Q5: How do I handle expansion and contraction of WPC panels?
Leave small gaps at joints and use flexible trims to accommodate material movement.
References
- Smith, J. (2022). Wood-Plastic Composites in Interior Design. Design Press.
- Johnson, L. (2021). Modern Wall Panel Installation Techniques. Architectural Review Journal.
- Green Building Council. (2020). Sustainable Materials for Interior Walls. GBC Publications.