English
 Español
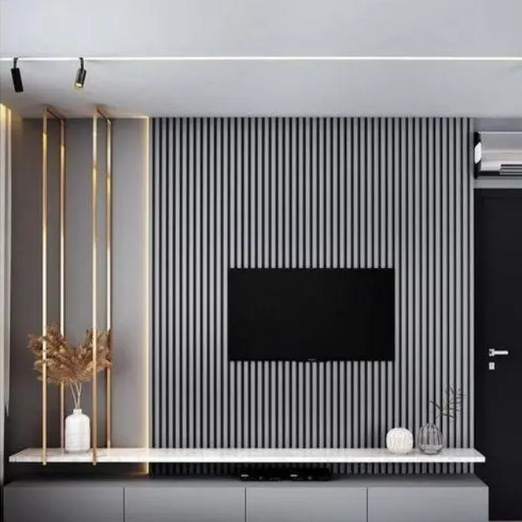
Installing WPC wall panels does not require a tiler or complex tools. If you have some basic handyman experience, you can completely finish a room's wall decoration by yourself. This saves labor costs and gives you the satisfaction of transforming your own space.
This guide is prepared for DIY users, covering everything from tool preparation to installation steps and handling common problems.
1. Assess Whether You Are Suitable for DIY
Before starting, confirm the following conditions:
You have one to two days of continuous time to work.
You have basic tools at home (drill, saw, spirit level).
You are willing to spend time measuring and planning rather than adjusting as you go.
The wall you plan to install on is not severely uneven or has large hollow areas.
If you meet these conditions, DIY is feasible. If the wall requires major repairs or you are completely unfamiliar with tools, it is better to hire a professional.
2. Tools and Materials List
Tools:
- Tape measure (5 meters or longer)
- Spirit level (60 cm or longer)
- Drill with cross-head bit
- Hand saw or circular saw (fine-tooth blade)
- Rubber mallet (for tapping joints)
- Marker pen
- Safety glasses and dust mask
Materials:
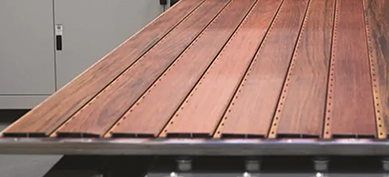
- WPC wall panels (buy 5% to 10% extra for waste)
- Furring strips (wood or light-gauge steel, prepare one every 40-60 cm)
- 304 stainless steel screws (or galvanized screws for indoor use)
- Trim pieces (outside corner, inside corner, starter strip, edge trim)
- Wall plugs and expansion screws (for fixing furring strips to the wall)
3. Step 1: Measure and Calculate
Use a tape measure to measure the wall width and height, then calculate the total area. If there are doors or windows, measure their areas and subtract them.
Divide the total wall area by the coverage area of one panel to get the number of panels needed, then multiply by 1.05 to 1.10 (waste factor).
Example: A wall 3.6m wide and 2.4m high has an area of 8.64 square meters. A single panel is 0.2m wide and 2.4m long, covering 0.48 square meters. Panels needed: 8.64 / 0.48 = 18 panels. Add 10% waste = 20 panels.
Calculate furring strips: Vertical strips every 40-60 cm. For a 3.6m wide wall, at 50cm spacing, you need 7 to 8 strips, each 2.4m long.
Trim pieces: Measure the total length of all outside corners, inside corners, top edges, bottom edges, and door/window frames.
4. Step 2: Wall Preparation and Furring Strip Installation
Clean the wall surface, removing protruding nails, loose wallpaper edges, etc. The entire wall does not need to be flattened, but bumps higher than 5mm should be removed.
Use a spirit level and marker to draw a horizontal reference line on the wall to ensure the furring strips will be on the same plane. Mark furring strip positions on the wall at 40-60 cm intervals.
Drill holes at the marked positions and insert wall plugs. Place a furring strip against the wall, check verticality with a spirit level, then fix it with expansion screws. The furring strips must be vertical and coplanar; otherwise the installed panels will be crooked.
After installing all furring strips, use a long straightedge or string line to check that all strips are on the same plane. Use thin shims to level any uneven strips.
5. Step 3: Install the First Panel
Start from the bottom left or bottom right corner of the wall. Install a starter strip (an L-shaped trim) on the lowest furring strip, fixing it with screws. The starter strip holds the first panel and covers the bottom edge.
Insert the first panel's tongue or groove into the starter strip, pressing it against the furring strips. Check verticality with a spirit level. Drive screws into the slot on the edge of the panel, fixing it to the furring strips. The screw head should be slightly below the panel surface, not over-tightened.
Note: Only the slotted side of each panel needs screws; the other side is inserted and does not require screws.
6. Step 4: Install Subsequent Panels
Insert the tongue of the second panel into the groove of the first panel. Gently tap along the joint with a rubber mallet until the two panels fit tightly. Do not use a steel hammer directly on the panel surface, as it will leave dents.
After tapping tight, drive screws into the slotted side of the new panel to fix it to the furring strips. Repeat this process, installing panels one by one.
Every three to four panels, check the overall flatness with a spirit level. If deviation is found, you can slightly adjust the tilt of subsequent panels to correct it. But if deviation is too large, you must remove and reinstall.
7. Step 5: Handle Doors, Windows, and Corners
Door and window openings: Measure the dimensions around the opening. Cut panels to size. Pay attention to orientation so that joints align. Cover the edges of the opening with edge trim.
Outside corners (protruding corners): After installing the panels on both sides of the outside corner, attach an outside corner trim over the corner, fixing it with screws or adhesive. The trim covers the cut edges and protects the corner from impact.
Inside corners (recessed corners): Similarly, cover the joint with an inside corner trim.
Top edge finishing: When installing panels up to the ceiling, leave a 5-10 mm gap at the top, then cover with a top trim. This gap allows for thermal expansion.
8. Step 6: Final Touches
Check that all screws are tightened but not over-driven. Optionally, cover screw heads with matching color touch-up pens. Wipe away surface dust and fingerprints with a damp cloth. Clean the floor.
If desired, apply a bead of neutral anti-mold sealant at the junctions between panels and the floor or door frames for a cleaner look and better waterproofing.
9. Common DIY Mistakes and How to Avoid Them
Mistake 1: Furring strips are not coplanar. Result: Installed panels are twisted, with uneven joints. Avoidance: Check repeatedly with a straightedge or string line when installing furring strips.
Mistake 2: Forgetting to leave expansion gaps. Result: Panels buckle in summer due to expansion. Avoidance: The tongue-and-groove design naturally leaves a small gap, but also leave 5-10 mm at the top and bottom.
Mistake 3: Screws driven too deep. Result: Dents on the panel surface. Avoidance: Drive screws until the head is flush or slightly below the surface.
Mistake 4: Chipping during cutting. Result: Rough edges, poor joints. Avoidance: Use a fine-tooth blade, cut slowly, and apply masking tape along the cut line.
Mistake 5: First panel not installed vertically. Result: All subsequent panels follow the same tilt. Avoidance: Take time to carefully calibrate the first panel with a spirit level.
10. When to Call a Professional
Do not attempt DIY in the following situations; contact an installer instead
- The wall is severely uneven and requires extensive leveling or waterproofing.
- The wall area is very large (over 30 square meters) or height exceeds 3 meters.
- There are many electrical outlets, switches, or pipes requiring holes.
- You want the job finished in one day and do not want to spend two to three days doing it yourself.
Summary
DIY installation of WPC wall panels is entirely feasible. As long as you measure carefully, prepare your tools, and follow the steps, you can complete an ordinary bedroom wall in one day. The labor cost you save can be spent on better materials. If you encounter problems during installation, feel free to contact us. We can provide guidance via photos or videos. Good luck with your DIY project.