English
 Español
The transformative power of 3d wood wall panels is undeniable. These architectural elements add depth, texture, and warmth to any space, moving beyond mere decoration to become a fundamental aspect of interior design. For contractors, architects, and property developers, a critical question arises before any project begins: what surfaces can actually support these panels? The versatility of acoustic wall panels and decorative varieties is a significant part of their appeal, but successful installation is predicated on understanding substrate compatibility.
A fundamental principle to grasp is that the longevity and integrity of the installation are almost entirely dependent on the preparation of the underlying surface. 3d wood wall panels require a stable, flat, clean, and dry substrate to perform as intended. Failure to properly prepare the surface can lead to issues such as warping, adhesion failure, visible imperfections, and even mold growth. Therefore, the process begins long before the first panel is ever placed.
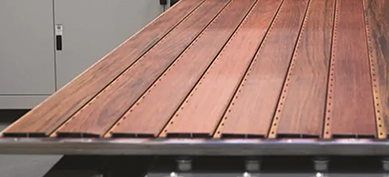
The Gold Standard: Plywood and Oriented Strand Board (OSB)
For new construction or major renovation projects, installing 3d wood wall panels over a plywood or OSB substrate is often considered the ideal scenario. This method provides the installer with maximum control, ensuring a perfectly flat and robust surface from the outset.
Plywood and OSB are dimensionally stable engineered wood products that resist shrinking, swelling, and warping better than solid wood planks when exposed to minor moisture fluctuations. Their consistent surface has no voids or significant imperfections, which means the wood wall decor will lie completely flat, with no underlying bumps or dips telegraphing through. This is especially crucial for larger-patterned panels where any deviation from flatness would be highly noticeable.
The installation process over these materials is straightforward. First, ensure the plywood or OSB is securely fastened to the wall studs, with all screws countersunk. The surface must be free of dust, grease, or any other contaminants. While some installers may apply panels directly to a clean plywood surface using a high-strength construction adhesive, a more reliable method involves first installing a thin layer of foam-backed paneling underlayment. This underlayment can help mitigate any minuscule imperfections and provides an additional layer of acoustic insulation, enhancing the sound absorbing properties of the entire wall system. The 3d wall panels are then typically adhered to this prepared surface using a recommended adhesive, following the manufacturer’s guidelines for coverage and clamping time.
Common Interior Walls: Drywall and Plaster
The vast majority of residential and commercial interiors are finished with drywall (also known as gypsum board or plasterboard) or traditional plaster. These surfaces are excellent candidates for 3d wood wall panels, provided they are in good condition. The key here is a thorough assessment and meticulous preparation.
A structurally sound drywall or plaster wall must be intact, firmly attached to the studs, and, most importantly, dry. Any signs of moisture damage, such as staining, softening, or crumbling, must be addressed at its source before installation can even be considered. The surface should also be checked for flatness using a long level or straight edge; significant bows or dips may require skimming with a joint compound to create a perfectly plane surface.
Preparation involves several critical steps:
- Cleaning: Remove all dust, dirt, and oils. A quick wipe with a damp (not wet) cloth followed by drying is often sufficient.
- Repairing: Fill any holes, dents, or cracks with a spackling or joint compound. Sand the repairs smooth once dry.
- Priming: This is a non-negotiable step. An application of a high-quality primer is essential. Primer seals the porous surface of the drywall and plaster, preventing the adhesive from drying too quickly and ensuring a strong, consistent bond. It also prevents the paper face of drywall from discoloring the panels over time.
Once primed and fully dried, the interior wall cladding can be installed using a heavy-duty construction adhesive specifically designed for vertical applications. Mechanical fasteners like brad nails can be used sparingly in the deepest grooves of the pattern to hold the panel in place while the adhesive cures, ensuring immediate stability.
Challenging Surfaces: Concrete and Cinder Block
Basements, commercial spaces, and certain modern architectural designs often feature walls made of concrete or cinder block. While these surfaces present more challenges than drywall, they are by no means incompatible with 3d wood wall panels. The primary challenges are moisture, porosity, and surface irregularity.
Concrete is notoriously porous and can wick moisture from the ground, even if it appears dry on the surface. Installing any wood product directly against a damp concrete wall will inevitably lead to mold and panel failure. Therefore, the first step is always a moisture test. Plastic sheeting can be taped securely to the concrete wall; if condensation appears under the plastic after 24 hours, the wall has significant moisture issues that require a dedicated damp-proofing membrane or sealing system before proceeding.
Assuming a dry wall, the installation process involves creating a suitable framework. The most effective method is to install wood wall panels over a battens framework. Pressure-treated wood or metal furring strips are attached vertically to the concrete wall using concrete anchors or powder-actuated fasteners. A level is used to shim these strips as needed, creating a perfectly plumb and flat plane. Crucially, a vapor barrier plastic sheet should be installed between the concrete and the battens to block any residual moisture. Plywood or drywall can then be attached to the battens, creating a new, stable substrate identical to those described in the previous sections. The 3d wood panels are then adhered to this new surface.
For known dry concrete walls in good condition, some high-strength adhesives are marketed for direct application. However, the battens method remains the most reliable and professional approach, as it also allows for the easy running of electrical wires behind the new wall and adds a layer of thermal insulation.
Special Considerations for Non-Traditional Surfaces
The application of 3d wood wall panels is not limited to standard walls. Their use on ceilings and as decorative room dividers is increasingly popular, though these applications demand specific techniques.
Ceilings: Installing panels on a ceiling introduces the constant challenge of gravity. While adhesives are strong, they require time to cure and gain full strength. For ceiling applications, the use of mechanical fasteners is virtually mandatory. A combination of a strong adhesive and screws or nails driven through the deepest parts of the pattern into ceiling joists is the recommended method. The substrate must be exceptionally secure; existing popcorn or textured ceilings should be scraped smooth and primed, or preferably, covered with a new layer of drywall to ensure a flat, stable base.
Existing Tile: Installing over ceramic or plastic tile is possible but requires careful preparation. The grout lines create an uneven surface that will likely show through thin panels. The glossy, non-porous surface of tile is not conducive to adhesion. To succeed, the tile must be thoroughly scuffed with coarse-grit sandpaper to create a rough surface for the adhesive to grip. All dust must be removed, and a primer designed for glossy surfaces should be applied. Even with these steps, the inherent unevenness means this is a less-than-ideal substrate. For a guaranteed result, removing the tile is the best course of action.
The following table summarizes the key preparation needs for primary surface types:
| Surface Type | Preparation Required | Key Consideration |
|---|---|---|
| Plywood/OSB | Secure fastening, dust removal. | Provides an ideal, stable base for direct installation. |
| Drywall/Plaster | Repair imperfections, sand smooth, apply primer. | Primer is critical for proper adhesive bonding. |
| Concrete/Cinder Block | Moisture test, install vapor barrier & battens, add new substrate. | Moisture management is the absolute priority. |
| Ceilings | Ensure substrate is secure; use mechanical fasteners into joists. | Gravity requires a fastener-and-adhesive combination. |
| Existing Tile | Sand glossy surface, clean thoroughly, apply specialty primer. | Surface unevenness and adhesion are significant challenges. |
Universal Principles for Successful Installation
Regardless of the specific surface, several universal principles govern the successful application of 3d wood wall panels. Adhering to these guidelines will ensure the finished project is both beautiful and durable.
Acclimation is Critical: Wood is a natural material that expands and contracts with changes in temperature and humidity. Upon delivery, the panels must be acclimated to the room where they will be installed. Leave them in their packaging, stacked flat, in the room for at least 48 hours before installation. This allows the wood to stabilize at the room’s ambient conditions, minimizing future movement.
The Right Adhesive is Everything: Never use a generic adhesive. Select a high-strength construction adhesive specifically designed for vertical applications and the weight of wood panels. Follow the manufacturer’s instructions for application, including notch trowel size, open time, and required clamping pressure. Using too little adhesive or the wrong type is a common cause of failure.
Environment Matters: Install 3d wood wall panels in a climate-controlled environment. Extreme temperatures or high humidity can affect both the adhesive’s curing process and the wood itself. The ideal installation environment mirrors the conditions in which the space will be used long-term.